Main Page
A living room rug can be any size, from a 3'x 5' or 4' x 6' accent rug in front of the couch to a large carpet that nearly fills the room. We can get you thinking, however, with these general observations....
Will the rug be foreground or background?
That is, do you want the rug to set the visual tone in the room, or is something
else visually more important? If the space is bland and neutral in color and
feel, a bold(er) rug design with more saturated colors and stronger color
contrasts will add impact and be be the first thing you notice in the room. If
the space is already quite busy with artwork, architectural detail, bookcases,
lots of furniture, etc., a larger, more quiet rug will have the effect of
knitting the space together and calming the room.
Multiple rugs define multiple spaces
Sometimes the living room is so large that it seems to lack human scale--you're
sitting here, and your guests are sitting way over there. Several
rugs can be used to carve out multiple spaces that feel more intimate and homey
in a large room.
First, think about how the room is used. Is there a natural focus like a
fireplace or gorgeous view? Is there a secondary area that will take a
comfortable stuffed chair, sidetable, and bridge lamp? Spaces like these can be
defined with appropriately sized rugs. The effect is to organize a large space
into more complex but more human-sized areas.
A long term tendency toward using smaller rugs
Since the 1950's people have been choosing smaller living room rugs. When
wall-to-wall carpeting was in vogue, people so individualistic as to buy
Oriental rugs chose big rugs that nearly filled their living rooms. Some of
those gigantic Oriental rugs can cost what it would take to pay off your home loans. A typical arrangement
was a nearly wall-to-wall Oriental with furniture arranged around its perimeter.
These days hardwood floors are an expensive and attractive architectural detail,
and it seems silly to cover them up. Living room rugs are commonly sized today
so that major pieces of furniture (couches, loveseats) abut the rug, but do not
sit on the rug. When you sit on the couch your feet are on the carpet. You can
appreciate the carpet's design and colors because it's not hidden under the
furniture.
You can use quite a small rug as the "main" rug in a living room. An
arrangement consisting of a 5' x 8' rug centered on the fireplace in front of a
couch and endtables, and flanked by two upholstered easychairs, will occupy a
floor space of about 12' x 18'.
How do rugs relate to each other?
If you use more than one rug in your living room, how do you make them
compliment each other? Firstly, there needs to be a clear hierarchy: one rug
needs to be in charge. You can usually do this automatically by making one rug
larger than the other(s). The big rug is the boss. Think about a 14' x 24'
livingroom. The space would comfortably hold two 8' x 10' rugs side-by-side, but
this arrangement splits the room right down the center and invites psychological
disquiet. It would be hard to make this room seem restful. Much better to use a
bigger rug in one area and a smaller and clearly secondary rug in another.
|
|
|
There is also the issue of how to relate colors and patterns in two (or more)
rugs. Basically, rugs can resemble one another in three characteristics: color,
design, and texture. The more rugs share the same attributes of
color, design, and texture, the better they will "go together." Be
careful, though! Too much similarity submerges the individuality that makes a
particular rug interesting. Better not to try to clone the big rug in a smaller
size, but rather to find a smaller rug with an allover pattern instead of the
big rug's medallion design, or a smaller rug in the inverse color combination of
the big rug. The small rug should add something unique to the space.
![]()
Here's a scaled graphic of a red dining room rug, tan dining table, and six green chairs. The dining table measures a standard 42" x 64". Note that if the rug measures 8' x 10' (as it does here), there is room to pull the chairs out from the table with the back legs of the chairs remaining on the rug. If the back chair legs go off the rug, it's difficult to sit down and scootch the chair in to the table while simultaneously lifting the back legs.
|
|
|
A rug measuring 8' x 10' is usually the place to begin in a dining room, but note that other considerations can affect the size you choose:
Extra leaves in the table
If you frequently use the table with extra leaves inserted, the 10' length can
be too short--now the back legs of the chairs at the end of the table go off the
rug when the chairs are pulled out.
Servers, sideboards, corner cubboards
It's usually best to size the dining room rug so that it doesn't go under the
front of the server, sideboard, or corner cubboard. If just the front of one of
these pieces sits on the rug, you'll probably need some sort of wooden or hard
rubber shim under the rear legs to make the piece sit straight and level.
A 6' x 9' rug for a dining room (or dining area) that's rarely used
If all the mealtime activity in your home takes place in an eat-in kitchen, you
can probably live happily with a smaller rug under the table in the dining room.
A 6' x 9' rug will usually hold a table and chairs comfortably, and will look
well when the chairs are pushed in to the table; it's only when you pull the
chairs out and partially off the rug that the problem surfaces....
A less expensive rug for the dining room
We experience rugs in different ways in different rooms. A good rug is a real
plus in the room where you spend lots of time. When you're there alone there
will come contemplative moments when you find yourself pondering the rug. When
you are entertaining there is the inevitable lull in the conversation during
which everyone studies the carpet.
A rug in the dining room is experienced much more peripherally than in many
other areas; most of the time in the dining room you're eating and conversing,
not paying special attention to the design of the wallpaper or carpet. Better to
save some $$ and buy a less expensive rug for this room.
A carpet with allover design?
We sometimes wonder if it is us or our customers, but rugs destined for use in
dining rooms often seem to end up with allover designs. It makes some sense that
this be so. With the table and chairs covering the center of the carpet, there
can be a little psychological mystery about what lies in the center of the rug.
Is that a central medallion in the design under the table, or a forgotten
napkin, or a sleeping cat? A rug with an allover pattern dispells the mystery.
![]()
Let's make ourselves comfortable and design a 12' x 15' master bedroom. Oh,
and while we're at it, let's choose a queen size bed (60" x 80"). What
size rug will this bedroom accommodate?
The room will certainly take a 9' x 12' carpet, and maybe even a 10' x 14'.
But wait a minute--do we really want to do this? No matter how we arrange the
bed, we'll cover a good chunk of the carpet, meaning that we won't really get to
enjoy the full beauty and utility of the rug. There is also the problem of the
inevitable dust bunnies that will come to live under the bed. It's much easier
to clean a bare floor!
Instead of a big carpet in the bedroom, lots of our customers use several
scatter rugs to fill areas around the bed as needed. For instance, a 4' x 6' at
the foot of the bed and a 2'6" x 10' runner and 3' x 5' on either side of
the bed means that you can still roll out in the morning onto a soft, warm,
lovely Oriental rug. Plus, you've paid for 64 sq. ft. of rug instead of 108 sq.
ft.!
|
|
|
![]()
We consider a "runner" to be a rug in any size from about 2' x 5' to 3'+ x 20'+. Most runners measure about 2'6" wide. Runners can be as narrow as 2' or wider than 3', but as widths diverge from 2'6", the number of runners found decreases. There is a slight tendency for runner width to increase as runner length increases. It is not uncommon, for instance, to find 18' or 20' runners that measure 2'8" or 2'9" in width. Older runners (rugs from the 1920's and 30's) were often wider, often wider even than 3'. It is not unusual to find an older Hamadan or Kurdish runner that has been reduced in width by having guard borders removed from the sides to make it fit in a space in an American home. We rarely see new runners longer than 22' or (maybe) 24'.
Click for how to install a stair runner. A fun, do-it-yourself project!
What size runner for the stairs?

Stairs consist of treads and risers. Almost always, stairways
are laid out so that risers are of equal (or very nearly equal) height. A
difference of 1" in the height of a riser in the middle of a stairway is
huge; you would nearly stumble on this step going up or down stairs. In
contrast, a difference of 1", 2", or 3" in the depth of a tread
somewhere in the stairway is almost unnoticeable. Treads can be of several
different depths in the same stairway. It is not uncommon for there to be one or
two wider, deeper treads at the bottom of the stairway.
Quite often a tread-and-riser combination will work out to be very close to
18" total (10" for the tread and 8" for the riser). Thus a
stairway with 12 tread-and-riser combinations would need 12 combinations times
18", plus an allowance for how you will start/end the rug. 12 x 18" is
216" or 18' long. But remember that treads can vary in depth! Thus, to
accurately estimate the length of runner needed to cover the stairs you need to
measure 1) the depth of each tread (in case they vary) and 2) the height
of the risers. Be sure to measure the risers on the diagonal from the
"nose" or lip of one tread to the point below where the bottom of the
riser and the next tread meet. This is because, when installed, the runner will
flow from the nose of one tread to the corner formed by the riser and tread
below. The runner doesn't get tucked under the nose tight to the riser.
To the rough estimate of length you've already made you need to add (or maybe subtract) some adjusting amount depending upon where you begin and/or end the runner on the stairs. You can begin/end the runner in several different ways:
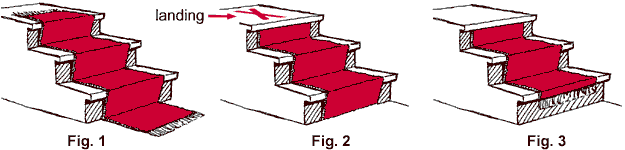
Of course, other arrangements are possible... you can combine the top of Fig.
1 with the bottom of Fig. 2 or Fig. 3, etc., etc.
By far the easiest way to measure the runner length you need is to use a
long, flexible 50' or 100' tape measure. Tape the end of the tape measure at the
top of the stairs where you want the runner to start, then flow the tape measure
down the stairs simulating the path the runner will take. Take the length from
the point where you want the runner to end.
Usually you will measure the stairs and think about how you might want to
begin and end the runner. These cogitations will give you a runner size to go
looking for. Unfortunately, because Oriental rugs are all handmade and not
cut-to-length, you probably won't find a runner that you really like in
precisely the size you need. All is not lost! Find a runner you like that's as
close as possible to the theoretical size you need. Now, adjust the installation
of the rug to take up extra length if the rug is too long (as in Fig. 1), or to
cover fewer risers (as in Fig. 3). It's easy!
NOTE: It is not so easy to adapt an Oriental runner to fit on circular
stairs or stairways with curved sections and pie-shaped treads, and the results
are rarely satisfactory. Better to install a runner on the straight section(s)
of the stairs, and carpet the turns with wall-to-wall.
Click for how to install a stair runner. A fun, do-it-yourself project!
Medallion designs on the stairs
Customers are sometimes worried about using runners with repeated medallion
designs on the stairs because almost never will the medallions fall regularly on
the treads. This is a bigger problem in theory than in practice. It does not
look odd to have the first medallion fall on a tread, the next between a tread
and riser, and so on. You still will see and appreciate the intention of the
design whether climbing or descending the stairs. Loosen up! Let go of some of
those neatnik complusions!
Practical designs and colors for the stairs
Stair runners usually get heavy traffic, and once installed, it can be many
years before a runner is removed for a complete cleaning. The most camouflaging
design is the darkest and busiest pattern you can find. Try the penny test:
close your eyes and drop a penny on the rug. If it takes a second or two to find
it, the rug is perfect! It's design and color combination will hide years and
years of traffic.
![]()
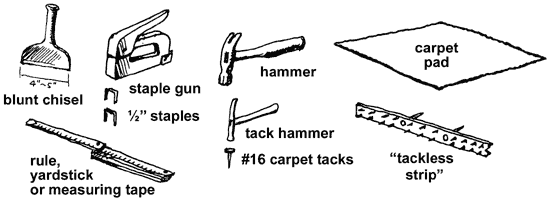
Tools and materials
We're going to do a typical Oriental runner installation on a stairway. We'll be
using these tools and materials:
The installation
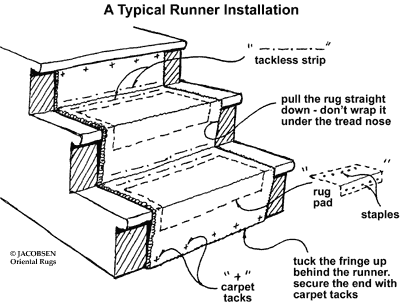
1. Cut pieces of tackless strip (usually available at Home Depot or Lowe's;
comes in 4' lengths) about 1 1/2" narrower than the width of the runner.
You need one piece at the back of each tread and one piece at the bottom of each
riser. Mark the center of the pieces of tackless, and mark the center of the
treads where the treads and risers meet at the back of the treads.
2. Attach one tackless strip at the back of the first tread. The tackless should be about 1" out from the corner formed by the back of the tread and the bottom of the riser for thinner rugs, and as much as 2" out from the corner for very thick runners. Adjust as necessary. The strip should be centered on the mark you made in Step 1. The tacks in the strip should face back toward the riser.
3. Attach one tackless strip at the bottom of the first riser. The tackless should be about 1" up from the corner formed by the back of the tread and the bottom of the riser for thinner rugs, and as much as 2" up from the corner for very thick runners. Adjust as necessary. The strip should be centered on the mark you made in Step 1. The tacks in the strip should face down toward the tread. Repeat Steps 2 and 3 for all the treads and risers to be covered by the runner.
4. Cut a piece of carpet pad for each tread. The pieces of pad should be the same width as the tackless strip, and deep enough to butt against the tackless strip at the back of the tread and wrap down over the edge or "nose" of the tread. The pad should end short of the tackless on riser below the tread.
5. Attach a piece of carpet pad to each tread. Center the pad and butt it against the tackless at the back of the tread. Fasten with a staple at the back corners and every 6" paralleling the tackless. Wrap the pad down over the nose of the tread and staple the corners and every 6" to the riser. Repeat for all the treads.
6. Rub the pile of your runner with the palm of your hand. Notice that the pile lays smoothly in one direction. Face the rug with the pile laying toward you. You will install the runner with the far end at the top of the stairs. By doing this, you arrange for the pile to face down on the risers. The pile catches less dirt this way, and the runner will last longer and look better.
7. Start the rug at the top of the stairs. If beginning under the nose of the upper landing, fold the fringe to the back of the rug, center the rug at the top of the riser, snug the end up tight under the nose, and fasten the top edge to the riser with a carpet tack at each corner and every 4" across the end. If starting the rug on the upper landing, cut a piece of carpet pad long enough to sit under the rug and extend down over the nose of the landing onto the riser below. Staple the pad in place on the landing and on the riser. Fasten the rug over the pad with a carpet tack at each corner and a tack every 4" across the end and down the edges on the landing. The attachment of the end of the runner on the landing must be good and secure to be safe.
8. Smooth the rug down to the bottom of the riser and push it back tight into riser-tread corner so it is gripped by the tackless strips in the corner. The runner should flow smoothly to the bottom of the riser. Do not tuck it back under the nose of the tread and tight to the riser. Be sure the runner is straight on the stairs. Wrap the runner out and over the next tread and check that length used to cover the riser and tread combination is what you expected. If the rug is running "long", you can take up a bit of extra length by re-setting the rug in the tackless corner so it is a little looser (but not much!) on the riser. If the rug is running "short", you can pull it more tightly down the riser, or push it not-quite-so-far into the tackless corner. When happy with the arrangement, pound the runner into the corner with the blunt chisel (you can also use the edge of a narrow piece of plywood, or any other tool you have that will let you tamp the rug into the tackless corner without cutting or piercing the face of the rug). The runner should be solid in the corner, with the tacks of the tackless strips gripping it across its full width.
9. Continue down the stairs, doing each riser-tread combination in turn.
10. Finish the installation at the bottom. If the rug finishes on the bottom tread with the fringe hanging down over the riser, shorten the last carpet pad so it doesn't show on the riser. Secure the end of the runner with carpet tacks as you did the top. If the runner finishes at the bottom of the bottom riser, tuck the fringe behind and secure with a row of tacks across the end of the rug at the bottom of the riser. If the runner ran longer than you thought, you can even fold a few inches of pile to the back and secure the rug at the bottom of the riser with 1 1/2" or 2" finishing nails. If the runner is to run out a bit onto the floor at the foot of the stairs, put a piece of carpet pad under it, and secure the end and edges of the rug with a few carpet tacks.
 12' x 24'
room
12' x 24'
room 12' x 24'
room
12' x 24'
room Chairs
Pushed In
Chairs
Pushed In 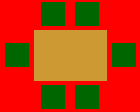 Chairs
Pulled Out
Chairs
Pulled Out  12' x 15'
bedroom
12' x 15'
bedroom  12' x 15'
bedroom
12' x 15'
bedroom